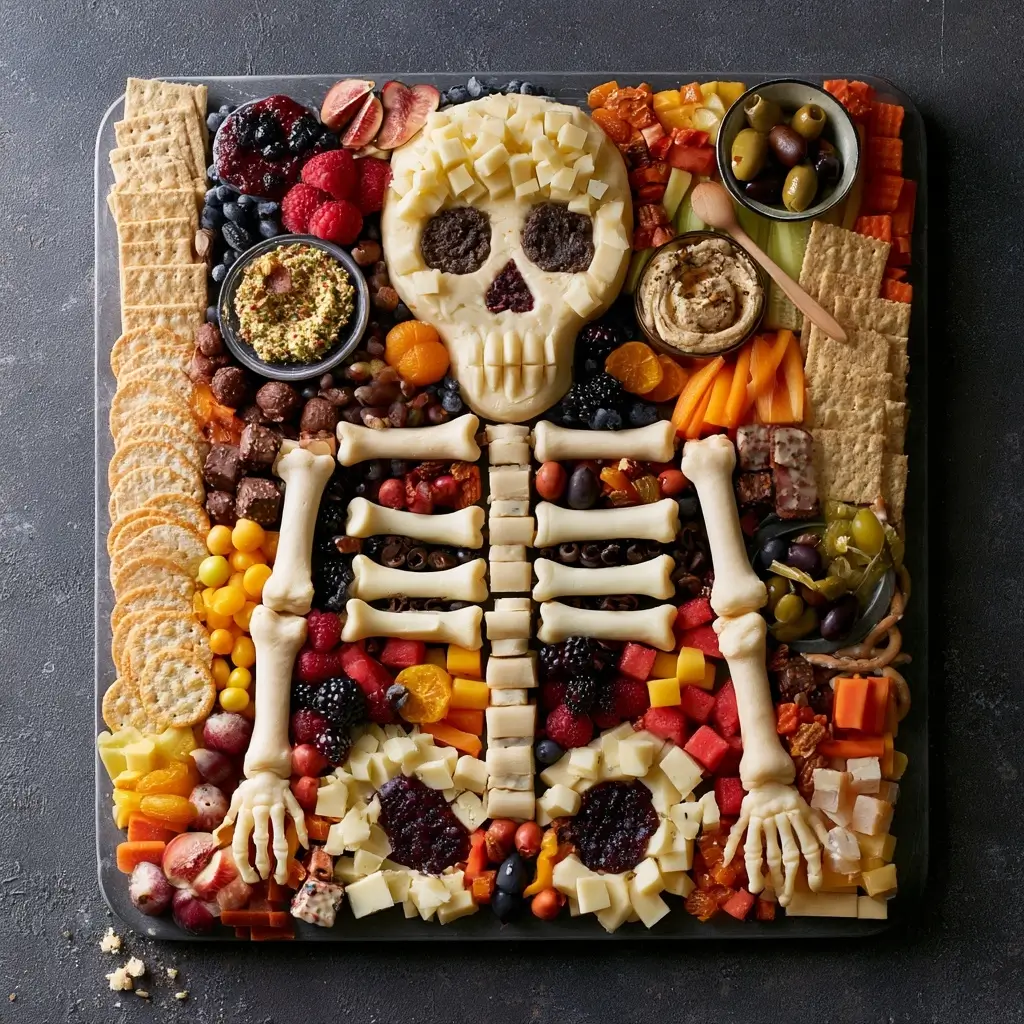
If you want a festive party idea that feels playful without being fussy, this Halloween Skeleton Snack Board is such a fun choice. It is easy to customize, simple to assemble, and makes a big visual impact on the table.
Halloween Skeleton Snack Board
Equipment
- 1 Large board or tray
- 1 Small bowls or dip cups for dips
Ingredients
- 2 cups white cheddar cheese cubes or mild cheese cubes
- 1 cup mozzarella balls
- 1 cup cucumber rounds
- 1 cup baby carrots
- 1 cup celery sticks
- 1 cup red grapes
- 1 cup green grapes
- 1 cup strawberries
- 1 cup black olives
- 1 cup crackers
- 1 cup pretzels
- 1 cup pita chips
- 1 cup hummus
- 1 cup ranch dip
- 1 cup almond butter or cream cheese dip
- 1 small bunch purple cabbage leaves or kale for garnish
Instructions
- Choose a large board or tray, then lightly picture the skeleton layout. Use one round bowl or small dip cup for the skull, then map out the spine, arms, ribs, and legs with snacks.
- Set the dip cup near the top for the skull shape. Add cheese cubes or mozzarella balls down the center for the spine, then build the rib area with crackers, cucumbers, or clusters of cheese and fruit.
- Use celery sticks, cucumber spears, pretzels, or carrot sticks to form the arms and legs. Arrange them in slightly bent lines so the skeleton looks lively and whimsical.
- Tuck grapes, strawberries, black olives, pita chips, and extra crackers around the body to fill empty spaces. Keep the mix balanced so every section has a little crunch, sweetness, and saltiness.
- Place small bowls of dip where needed, then add cabbage leaves or kale around the edges for a moody Halloween look. Serve right away, or chill briefly until party time.
Notes
Why You’ll Love This Halloween Skeleton Snack Board
This board brings a lot of personality to a party spread with very little stress. You can mix sweet and savory bites, use seasonal colors, and arrange everything into a skeleton shape that instantly gets people talking.
It also works well for guests with different tastes, since everyone can pick and choose what they like. Best of all, you can prep most of it ahead of time and finish the fun layout right before serving.
Halloween Skeleton Snack Board Ingredients & Substitutions
Here is a flexible mix you can use for the board:
- 2 cups white cheddar cheese cubes or mild cheese cubes
- 1 cup mozzarella balls
- 1 cup cucumber rounds
- 1 cup baby carrots
- 1 cup celery sticks
- 1 cup red grapes
- 1 cup green grapes
- 1 cup strawberries
- 1 cup black olives
- 1 cup crackers
- 1 cup pretzels
- 1 cup pita chips
- 1 cup hummus
- 1 cup ranch dip
- 1 cup almond butter or cream cheese dip
- 1 small bunch of purple cabbage leaves or kale for garnish
Easy swaps: Use cherry tomatoes instead of strawberries, sliced apples instead of grapes, or hummus instead of ranch if you want a brighter, fresher board. You can also swap any cheese for your favorite mild, sliceable cheese.
Step-by-Step Instructions to Make Halloween Skeleton Snack Board
1. Plan the skeleton shape
Choose a large board or tray, then lightly picture the skeleton layout. Use one round bowl or small dip cup for the skull, then map out the spine, arms, ribs, and legs with snacks.
2. Place the face and main body
Set the dip cup near the top for the skull shape. Add cheese cubes or mozzarella balls down the center for the spine, then build the rib area with crackers, cucumbers, or clusters of cheese and fruit.
3. Shape the arms and legs
Use celery sticks, cucumber spears, pretzels, or carrot sticks to form the arms and legs. Arrange them in slightly bent lines so the skeleton looks lively and whimsical.
4. Fill in with color and texture
Tuck grapes, strawberries, black olives, pita chips, and extra crackers around the body to fill empty spaces. Keep the mix balanced so every section has a little crunch, sweetness, and saltiness.
5. Add the finishing touches
Place small bowls of dip where needed, then add cabbage leaves or kale around the edges for a moody Halloween look. Serve right away, or chill briefly until party time.
Tips for Success
Use a large board so the skeleton shape has room to breathe. If the board feels crowded, the design can get lost, so leave a little negative space around the edges.
Try to vary color and texture in each section. A mix of crisp vegetables, juicy fruit, creamy dip, and crunchy snacks keeps every bite interesting.
If you are making it ahead, prep the produce and cheese first, then assemble the final board close to serving so everything stays fresh.
Variations of Halloween Skeleton Snack Board
For a sweeter version, build the skeleton with cookies, marshmallows, chocolate pieces, and fruit. This makes a great kid-friendly dessert table centerpiece.
For a more savory spread, lean into cheese, olives, roasted peppers, cucumbers, crackers, and dip. You can also add sliced turkey, mini meatballs, or roasted chickpeas if you want more protein.
If you love a colorful board, use orange segments, purple grapes, green kiwi, and bright red strawberries to make the whole presentation pop.
Serving Suggestions: What to Pair with Halloween Skeleton Snack Board
This board pairs nicely with other party snacks like mini sandwiches, soup shooters, popcorn mix, or a big bowl of seasonal chips. It also works well alongside punch, sparkling water, or apple cider.
If you are serving a larger crowd, add a simple dessert tray nearby so guests can move from savory bites to sweet treats without leaving the Halloween theme behind.
Storage & Reheating Instructions
Store leftovers in airtight containers in the refrigerator, keeping dips separate when possible. Most of the produce and cheese will stay fresh for 2 to 3 days, while crackers and pretzels are best stored at room temperature in a sealed container.
This board does not need reheating. If anything gets soft or soggy, replace it with a fresh batch before serving again.
Memories Made Around the Table
There is something special about a snack board that gets people gathering, chatting, and grazing together. I love how a playful Halloween layout can turn simple foods into a little table moment that feels festive and welcoming.
FAQs
Can I make this snack board ahead of time?
Yes, you can prep the ingredients a day ahead. Store the fruits, vegetables, cheese, and dips separately, then assemble the board right before guests arrive.
What board size works best?
A large wooden board, platter, or sheet pan works well. The bigger the surface, the easier it is to build the skeleton shape without crowding the snacks.
How do I keep the fruit from making the board wet?
Pat fruit dry before arranging it, and keep juicy items like grapes and strawberries grouped together. Adding them near the edge of the board can also help manage moisture.
Can I make this with all store-bought items?
Absolutely. Store-bought cheese, crackers, dips, and prewashed produce make this even faster to assemble, which is great for party day.
Final Thoughts
This Halloween Skeleton Snack Board is one of those easy ideas that looks impressive but stays wonderfully simple to put together. With a few colorful snacks and a playful layout, you can create a party centerpiece that feels fun, festive, and completely shareable.