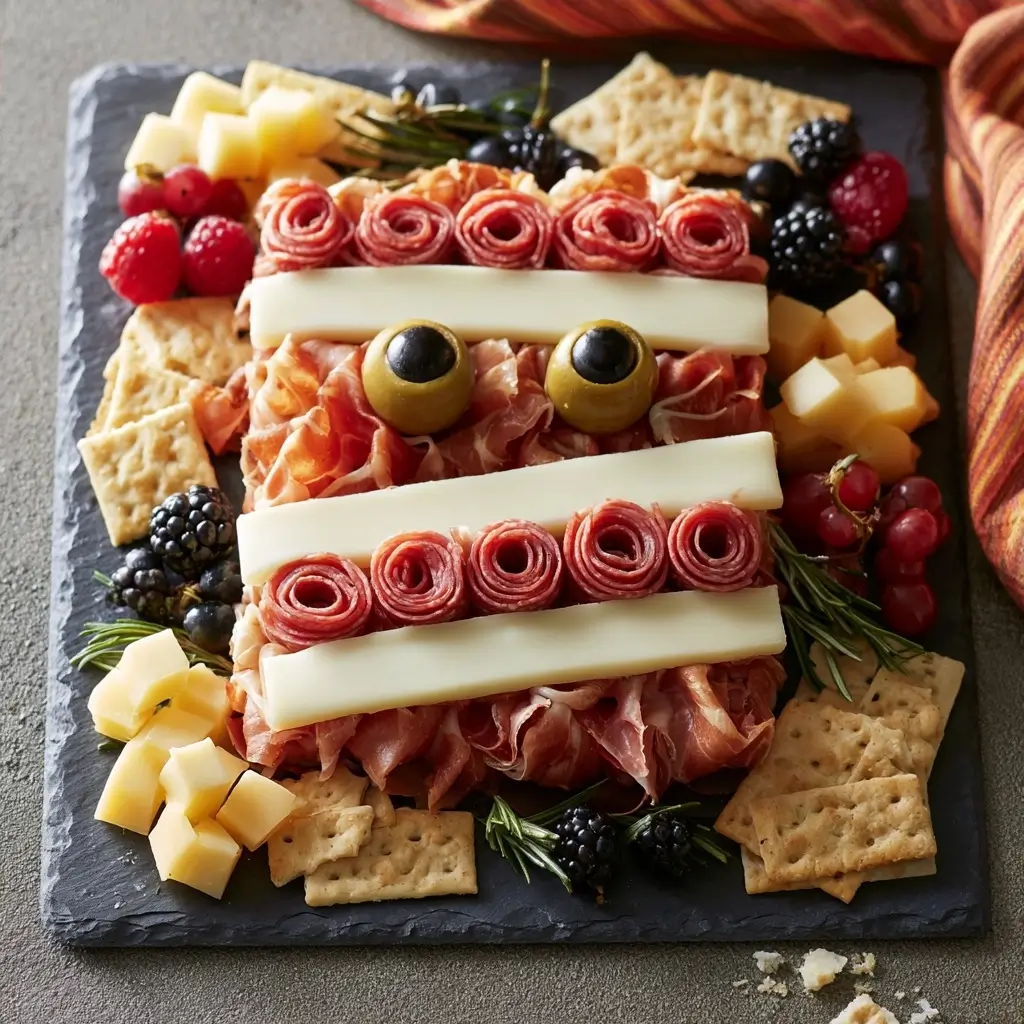
If you want a Halloween party idea that looks playful and comes together fast, this mummy shaped charcuterie board is such a fun choice. It is easy to style, simple to customize, and always gets people talking as soon as it hits the table.
Mummy Shaped Board
Equipment
- 1 Large serving board or platter
- 1 Small bowl for dip
Instructions
- Choose a large serving board or platter. Lightly picture the mummy outline first, with a wider center and a narrow head at the top.
- Place your cheeses, meats, fruit, and vegetables in grouped sections to fill in the mummy body. Keep the center area slightly open so the bandage design can stand out.
- Lay strips of mozzarella or folded slices of deli meat across the board in loose, uneven lines. Let some pieces overlap so it looks like wrapped mummy bandages.
- Use two olives, crackers, or small cheese rounds for the eyes. Place them near the top of the board so the mummy face is easy to spot.
- Slide in grapes, cucumber slices, cherry tomatoes, and crackers wherever you see open spaces. The goal is a full, balanced board that still keeps the mummy shape clear.
- Add the dip in a small bowl near the side or center, then serve right away or chill until guests arrive.
Notes
Why You’ll Love This Mummy Shaped Board
This board is a crowd-pleaser because it feels festive without requiring much effort. You can mix sweet and savory bites, use store-bought ingredients, and still create a centerpiece that looks thoughtful and creative.
It also works well for parties of different sizes. You can make it small for family snacking or larger for a Halloween buffet.
Mummy Shaped Board Ingredients & Substitutions
Here is a simple mix of ingredients that works well for the mummy shape.
- Assorted sliced cheeses, such as cheddar, mozzarella, and gouda
- Sliced turkey, chicken, or roast beef
- Crackers or toasted pita wedges
- Green grapes or red grapes
- Cucumber slices
- Baby carrots
- Cherry tomatoes
- Black olives
- Hummus or another dip
- Cream cheese or a whipped cheese spread
- Strips of mozzarella, cheese slices, or rolled deli meat for the mummy bandages
- Two large olives or small round crackers for the eyes
If you want to swap things around, use any favorite cheese, fresh fruit, or sliced vegetables you already have. For the bandage effect, thin cheese strips and rolled deli meat both work nicely. If you need a softer spread, whipped cream cheese gives a smooth base for the face.
Step-by-Step Instructions to Make Mummy Shaped Board
Step 1, Plan the shape
Choose a large serving board or platter. Lightly picture the mummy outline first, with a wider center and a narrow head at the top.
Step 2, Add the main body
Place your cheeses, meats, fruit, and vegetables in grouped sections to fill in the mummy body. Keep the center area slightly open so the bandage design can stand out.
Step 3, Create the bandages
Lay strips of mozzarella or folded slices of deli meat across the board in loose, uneven lines. Let some pieces overlap so it looks like wrapped mummy bandages.
Step 4, Add the face
Use two olives, crackers, or small cheese rounds for the eyes. Place them near the top of the board so the mummy face is easy to spot.
Step 5, Fill the gaps
Slide in grapes, cucumber slices, cherry tomatoes, and crackers wherever you see open spaces. The goal is a full, balanced board that still keeps the mummy shape clear.
Step 6, Finish and serve
Add the dip in a small bowl near the side or center, then serve right away or chill until guests arrive.
Tips for Success
Use a large board so the shape feels obvious and not crowded. Group similar colors together, because that helps the mummy design look neat and bold.
Start with the biggest items first, then tuck in the smaller pieces at the end. This makes it easier to control the shape and fill the board evenly.
If you want extra contrast, use lighter cheeses and darker olives or grapes. That simple color mix makes the mummy face pop.
Variations of Mummy Shaped Board
You can make this board sweet by adding strawberries, apple slices, mini cookies, marshmallows, and chocolate dip. For a more savory version, lean into cheese, cured meats, olives, nuts, and crunchy vegetables.
For a kid-friendly board, use mild cheese, crackers, fruit, and a yogurt dip. You can also make a breakfast version with waffles, berries, banana slices, and cream cheese.
Serving Suggestions: What to Pair with Mummy Shaped Board
This board pairs nicely with sparkling water, apple cider, or a simple fruit punch. It also works well with soup, sliders, or small sandwiches if you are serving it as part of a larger Halloween spread.
For a fuller party table, add popcorn, roasted nuts, and a second dip so guests have plenty to snack on between bites.
Storage & Reheating Instructions
If you have leftovers, remove the fresh fruit and vegetables and store them separately in airtight containers. Cheese and meats should be kept chilled and covered.
This board does not need reheating. For the best texture, assemble it close to serving time and refrigerate only until you are ready to bring it out again.
Memories Made Around the Table
Some of my favorite party food memories are the simple ones, when everyone gathers around a board and keeps reaching for just one more bite. A playful platter like this always makes the table feel relaxed, fun, and a little more special.
FAQs
Can I make this board ahead of time?
Yes, you can prep the ingredients a few hours ahead. For the freshest look, assemble the board close to serving time and add delicate items last.
What size board do I need?
A medium to large board works best. You want enough room to show the mummy shape without stacking everything too tightly.
How do I keep the shape looking neat?
Build the body first, then layer the bandage strips over the top. Fill in gaps with smaller items so the outline stays clear.
Can I make it without meat?
Absolutely. Use extra cheeses, olives, fruit, vegetables, crackers, and dip for a meat-free version that still looks full and festive.
Final Thoughts
This mummy shaped charcuterie board idea is one of those easy party projects that looks impressive with very little stress. With a few simple ingredients and a little arrangement, you can make a Halloween centerpiece people will remember.