
If you want a spooky snack that feels playful and easy to put together, this Halloween charcuterie board is such a fun choice. It is a mix of sweet and savory bites, dressed up with a graveyard theme that makes the whole table feel festive.
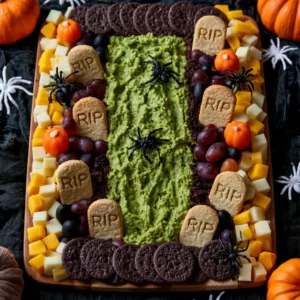
Halloween Charcuterie Board
Equipment
- 1 Large platter or board
Ingredients
- Crackers or pretzel sticks
- Sliced cheddar mozzarella, or gouda
- Turkey slices or turkey salami
- Seedless grapes
- Apple slices
- Strawberries
- Blackberries or blueberries
- Mini chocolate cookies
- Marshmallows
- Dark chocolate squares
- Hummus or a creamy dip
- Ranch dip or yogurt dip
- Olives for a spooky accent
- Tombstone shaped cookies or crackers optional
Instructions
- Pick a large platter, wooden board, or serving tray. A bigger surface gives you room to play with the graveyard theme and makes the layout feel full and inviting.
- Place the cheeses, dips, and larger items first. These anchor the board and help you decide where the rest of the snacks will go.
- Arrange the crackers, fruit, turkey slices, cookies, and chocolate in small groups around the board. Keep the colors balanced so every area feels lively.
- Use tombstone cookies, olive pieces, or little signs to give the board that graveyard look. A few playful touches go a long way here.
- Tuck in smaller items like berries, marshmallows, or pretzels to fill empty spaces. A full board always looks more festive and abundant.
- Set the board out just before serving so the fruit stays fresh and the crackers stay crisp. Then let everyone graze and enjoy.
Notes
Why You’ll Love This Halloween Charcuterie Board
This board is simple to assemble, but it looks like you spent a lot of time on it. It is perfect for parties, family movie nights, or a casual Halloween gathering when you want something fun without turning on the oven too much.
You can also customize it with your favorite snacks, which makes it easy to work with what you already have on hand. The mix of colors, textures, and little spooky details always gets people talking.
Halloween Charcuterie Board Ingredients & Substitutions
Build the board with a mix of sweet, salty, crunchy, and creamy bites. Here is a simple list to get you started:
- Crackers or pretzel sticks
- Sliced cheddar, mozzarella, or gouda
- Turkey slices or turkey salami
- Seedless grapes
- Apple slices
- Strawberries
- Blackberries or blueberries
- Mini chocolate cookies
- Marshmallows
- Dark chocolate squares
- Hummus or a creamy dip
- Ranch dip or yogurt dip
- Olives for a spooky accent
- Tombstone shaped cookies or crackers, optional
If you want a sweeter board, add more fruit, cookies, and chocolate. For a more savory spread, add extra cheese, cured turkey slices, and crunchy crackers. You can also swap in gluten-free crackers or dairy-free cheese if needed.
Step-by-Step Instructions to Make Halloween Charcuterie Board
Step 1: Choose your board
Pick a large platter, wooden board, or serving tray. A bigger surface gives you room to play with the graveyard theme and makes the layout feel full and inviting.
Step 2: Add the main anchors
Place the cheeses, dips, and larger items first. These anchor the board and help you decide where the rest of the snacks will go.
Step 3: Build the snack sections
Arrange the crackers, fruit, turkey slices, cookies, and chocolate in small groups around the board. Keep the colors balanced so every area feels lively.
Step 4: Add the spooky details
Use tombstone cookies, olive pieces, or little signs to give the board that graveyard look. A few playful touches go a long way here.
Step 5: Fill in the gaps
Tuck in smaller items like berries, marshmallows, or pretzels to fill empty spaces. A full board always looks more festive and abundant.
Step 6: Serve right away
Set the board out just before serving so the fruit stays fresh and the crackers stay crisp. Then let everyone graze and enjoy.
Tips for Success
Keep a mix of soft, crisp, and juicy items so every bite feels interesting. If you are serving kids, make the board a little sweeter with extra fruit and cookies.
For a neater look, group similar colors together, then add the spooky accents last. Also, chill the cheese and fruit before assembling so the board stays fresh longer.
Variations of Halloween Charcuterie Board
You can make this board as playful or as elegant as you like. Try a candy-heavy version with chocolate, gummies, and marshmallows, or a more savory version with cheese, olives, turkey slices, and crackers.
For a themed dessert board, lean into cookies, fruit, and dip. If you want a kid-friendly version, use fruit skewers and cookie tombstones for a cute graveyard effect.
Serving Suggestions: What to Pair with Halloween Charcuterie Board
This board pairs well with sparkling water, apple cider, or a simple fruit punch. If you are serving it as part of a bigger party menu, add soup, sliders, or a pasta dish to round things out.
It also works beautifully alongside a Halloween dessert table, especially if you want one centerpiece snack that guests can enjoy while they mingle.
Storage & Reheating Instructions
If you have leftovers, store the cheese, fruit, and meats separately in airtight containers. Crackers and cookies should be kept in a dry container so they stay crisp.
This board does not need reheating. For the best texture, let chilled items sit out for a few minutes before serving again, but do not leave them out too long.
Memories Made Around the Table
There is something special about snacks that invite people to gather, nibble, and talk. A Halloween board like this often becomes the first thing guests notice, and it sets such a cheerful tone for the night.
I love recipes that bring a little magic to the table without adding stress, and this one does exactly that.
FAQs
Can I make this board ahead of time?
Yes, you can prep most of the ingredients a few hours in advance. Keep the fruit chilled and assemble the crackers close to serving time so everything stays fresh.
What can I use instead of tombstone cookies?
You can use rectangular crackers, chocolate-covered biscuits, or even slices of cheese cut into simple tombstone shapes.
How do I keep apple slices from browning?
Toss the apple slices lightly with a little lemon juice or orange juice before adding them to the board.
Can I make this board without meat?
Absolutely. Add extra cheese, hummus, nuts, fruit, and crackers for a satisfying meat-free version.
Final Thoughts
This Halloween charcuterie board is the kind of recipe that makes entertaining feel easy and fun. With a little arranging and a few spooky touches, you get a festive centerpiece that everyone will want to snack on.